Showing posts with label dessert. Show all posts

Tuesday, August 18, 2009

TWD: Applesauce Spice Bars


I'm now officially ready for autumn! The kids are on their way back to school and we have amazing apple bars. Now if I could get Tampa, Florida to cool down a bit...

These spicy little bars were DEE-licious!!! We loved every bite!! They had a cake-like consistency with a perfect buttery-carmelly icing on top. The bits of apple and chewy raisins were a perfect pair mixed into all the homey deliciousness. The crazy thing about these is that they were even better the next day. Of course, I omitted the nuts because they would have ruined this yummy treat. But we all devoured them.

Thanks Karen for choosing this delicious recipe. I will definitely add this to my list of favorites!!!

Sunday, May 17, 2009

Peanut Butter Cheesecake Brownie Babies

Did this one pique your curiosity?

These are awesome!!  And they don't just have a little bit of peanut butter cheesecake flavor swirled around inside, it has a real mass of deliciousness in the middle that you can enjoy and let linger in your mouth for a while.  Yummy!!!

I found this recipe in Kraft's Food and Family magazine.  They always have fun (and easy) recipes and its free!!  They even have archives online if you missed something.

1 pkg brownie mix (19-21 oz., I prefer Ghiradelli mixes!!) + ingredients to make
1 pkg cream cheese (8 oz.)
1/3 c sugar
1 egg
1/4 c peanut butter
1/2 tsp vanilla
1 1/2 cups cool whip
20 maraschino cherries (optional)

Heat oven to 350 degrees.

Prepare brownie mix according to package directions.  Spoon into 20 muffin cups.  I like the silicone ones, they just pop right out.

In a separate bowl, beat cream cheese, sugar, egg, peanut butter, and vanilla with mixer until blended.  Spoon a rounded Tbsp into each muffin cup and use another spoon to pull brownie mix over the top.  You should still be able to see some of the cheesecake on top.  Bake 30 minutes or until centers are set.  Cool to room temp, then transfer to refrigerator.  

True cheesecake needs to be refrigerated for at least 24 hours.  I found that to be true with these as well.  These are great on the first day, but if you can wait 24 hours, they're even yummier!

Serve topped with cool whip and maraschino cherries.


Tuesday, May 12, 2009

TWD: Tartest Lemon Tart


Pucker up baby!!  This one is SOUR!!  Here is a recipe that truly lives up to its name.  It really is the TARTEST lemon tart ever!  It contains whole lemons (sans seeds) pureed with the rest of the filling.  

I took the liberty of omitting 2/3 of the rind.  I zested the lemon, then cut off and discarded the white part of the rind, then added the flesh of the lemon.  I made the original version of the sweet tart dough.  (I've just had my fill of nuts ground up in things lately.)   I have to say how much I LOVED the dough!!   I'm sure I'll be looking for reasons to use that one again.

Even with the changes, it was super sour, but very tasty.  I served it with a sweet cream and thought it was really good.  I even had to put it in the freezer, so I wouldn't eat it all in one night.

Thanks to Barbara of www.babettefeasts.com!  This was a fresh, fun change from some of the things I've made lately.  If you haven't checked out "Baking, from my home to yours" by Dorie Greenspan, check it out.  There are some amazing and delicious things in there!!

Tuesday, April 21, 2009

TWD: Four Star Bread Pudding

In an attempt to live a healthier life and balance the foods that are enriching to my body and the foods that taste amazingly delicious I have decided that baking is not going to happen in our home for a few months. It has been about four weeks and my husband stated on Friday that I am depriving our children of their childhood. I had to laugh. To some degree I agree. Baking goodies should be part of a child's growing up experience. I will be back at it soon, but hopefully this can help me be wise about our food decisions here. Okay thus the explanation....today we are so very lucky to have a guest baker add to the delights of Dorie. My fabulous friend, Erica, so kindly agreed to do the baking for me. She did a great review and has some fun pictures. Erica has a blog of her own called Just for Me and You. Hop on over if you are interested in winning some AWESOME products. This week the blog is featuring See Kai Run and there will be more later this week too. So let's turn it over to Erica.

Four-Star Chocolate Bread Pudding

I have to admit, “bread pudding” is not my favorite combination of words. When I think of bread pudding, I think of a bland, mushy concoction served at grandma’s house. However, any recipe titled Four-Star Chocolate is destined to pique my interest. I determined to reserve judgment and even found myself excited to try my hand at my very own mushy concoction.


The ingredients in this dessert are all very common and easily accessible; in fact, I found most of them already stocked in my fridge. I opted for challah as my bread base, and chose to omit the raisins. Assembling the pudding was the most fun. It was a simple process that even the kids participated in. Nothing is sweeter than baking that can be a family affair. We each had our turn smooshing the bread into the custard, or more appropriately, “giving the bread the back-of-the-spoon treatment.” There was no aspect of this dessert that was difficult, which made it a delight to create, regardless of the end result.

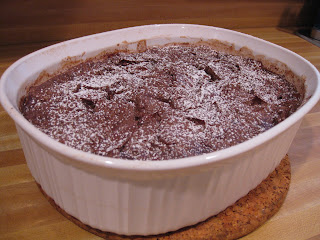
The Verdict:

The chocolate flavor of the bread pudding was divine; perfectly rich and decadent. In the end though, flavor can only take you so far and bread pudding is still bread pudding, and I am simply not a huge lover of bread pudding. The taste was definitely fabulous enough to have me finish my serving, but the texture of the pudding kept me from returning for seconds. In the end, if your heart holds a special place for bread pudding, this recipe will knock your socks off. Conversely, if the thought of bread pudding does not get you salivating, this recipe will not be enough to make you a believer.

Note:

I made the bread pudding in a 7-x-11 inch baking pan. If I were to make this again, I would choose to use a 9-x-13 to decrease the density and cooking time.

If you are interested in this recipe visit Lauren at Upper East Side Chronicle for the details.

Thanks again Erica!!

Saturday, March 7, 2009

Key lime cookies

I have made so much dark chocolate stuff lately, I just needed to "balance my diet"!! Ha!! Ok, but seriously, I just needed something different. Spring is here in Florida! So, here's what I came up with:

Key Lime White Chocolate Chip Cookies
1 pouch sugar cookie mix, made as directed with 1 stick butter and 1 egg
+ 1/2 package white chocolate chips

Key Lime Drizzle
1 1/2 tsps fresh lime zest
1 T softened butter
1 1/2 T fresh lime juice
2/3 c powdered sugar

Directions:
Mix white chocolate chips into sugar cookie mix. Bake as directed. I got about 25 good size cookies out of mine. Cool completely. (You may need to sneak one nice warm un-limified cookie.)

Mix ingredients for drizzle. You may need to add a few tablespoons of powdered sugar to get a good consistency. Spoon drizzle into a ziplock bag and snip a tiny hole in one corner. Pipe onto cookies, then allow drizzle to set up. Enjoy!! Maybe these cookies will bring spring to you a little sooner!

Tuesday, February 10, 2009

TWD: Floating Islands


When I originally read the description of the recipe I thought to myself, "Wow, this is going to be just fabulous!" Creme anglaise, meringue and caramel...how could you go wrong with those components? Well, I think this is the first of the TWD recipes that didn't "wow" me. In fact, I decided not to serve it to our friends who were coming for dessert. I used the creme anglaise over a cinnamon crumb cake that was from a box. Gasp! I know! But I liked it better than the Floating Islands. 

The creme anglaise turned out pretty good. I watched it on the thermometer and as it got into the 160's I thought it looked perfect. I should have followed my instinct and removed it from the heat right then because just a minute later it started to curdle a bit. After going through the strainer it was better but not amazingly good. When you over cook creme anglaise it begins to taste eggy instead of creamy and the texture is ruined and is not satiny smooth as it should be. But, I didn't want to start over again so I decided it would have to do. 

The meringue seemed simple enough. I whipped the egg whites and added the sugar and got it to the perfect stage. The first two came out looking like I thought they should but it kind of went downhill from there. I might have had the heat too high on the milk because some of them looked like plain cooked egg whites, and tasted that way too so they went right into the trash can. I'm not sure how some people said they cooked theirs for 3 minutes per side. Maybe I was doing something wrong. 

Oh bother, this isn't looking good at all! The caramel didn't want to cooperate either and struggled to reach a golden brown color so it went on lighter than it should have been. All-in-all this was kind of a disappointing kitchen day. Nevertheless, I still took a few pictures (but didn't feel like there were any great ones). I don't think this will be one I will make again. Fun for the challenge but it didn't amaze me by any means. I enjoyed the creamy texture of the creme anglaise against the fluffiness of the meringue and the crunchy caramel but there was just something missing for me. 

If you want to be brave and attempt this dessert yourself, head on over to Whisk: a food blog where Shari has it posted.

Until next week...Happy Baking!