Friday, February 27, 2009

Cookie Carnival: Chocolate Fudge Cookies with Toffee and Dried Cherries

Oh yummy! Yummy! Yummy!  This cookie intrigued me from the beginning.  You could say it "had me at hello".  I never would've considered putting toffee and dried cherries together, but it is amazingly delicious.  This is definitely a "grown-up" cookie with so much rich bittersweet chocolate.  Then you get the buttery toffee flavors and the zing of the cherries!  They were so fun to eat, maybe a little too fun!!


The recipe came from "In The Sweet Kitchen: The Definitive Baker's Companion" by Regan Daley.  You can view other people's experiences with this here and the recipe here.

Thursday, February 26, 2009

Magnificent Mint Brownies


I have always been on the hunt for a fabulous mint brownie recipe. Growing up I looked forward to attending any BYU event that might have BYU Mint Brownies as the dessert. They were the best! 

Well, my search for the best mint brownies ended when we attended a baptism a number of years ago. After the baptism there were mint brownies as part of the refreshments and after taking one bite I was sold. I had to have the recipe! Apparently this recipe comes from an elderly lady who was a neighbor of our friends, the Andersons. The elderly neighbor always included these brownies as part of her Christmas goodie plate that she gave to neighbors. Jane was kind enough to share the recipe with me and it has been a favorite ever since. In fact, I have taken them to events and introduced them as, "Brownies that are as good as BYU Mint Brownies" and have been told that they are better than BYU Mint Brownies. In my book, that is the ultimate compliment! 

Magnificent Mint Brownies
4 cups sugar
4 cups flour
8 eggs
1 cup cocoa powder
2 cups butter
2 cups semi-sweet chocolate chips
1/2 tsp salt


Cream butter and sugar together.   Add eggs one at a time.   Add flour, cocoa powder and salt.  Mix to combine. Add chocolate chips. 

Spray baking sheet pan with cooking spray and bake at 350 degrees for 28 minutes.  

Cool brownies. When completely cool, frost with mint frosting. Place pan in freezer until frosting has set . Remove from freezer and spread glaze on top. Freeze again until glaze is solid.

Mint Frosting

3/4 cup butter
6 T evaporated milk
6 cups powdered sugar
1 1/2 tsp peppermint or mint extract
Food coloring (green or pink) optional

Mix all together until smooth and creamy.

Chocolate Glaze

3/4 cup butter
4 tsp vanilla
2 cups semi-sweet chocolate chips

Combine butter and chocolate chips in microwave safe bowl. Melt on low heat in microwave stirring frequently until smooth. Add vanilla and stir to combine. 

p.s. You can cut the recipe in half and bake it in a 9x13 pan. 

Tuesday, February 24, 2009

Caramel Crunch Bars

Delicious!

I went through a phase shortly after Mimi was born where I ADORED toffee. I think that every creation I made needed a little bit of toffee in it (including cinnamon rolls). I have moved on from that phase but after making these I now realize why I felt the need to use toffee again and again. It is oh so yummy. I think if I was naming these I would have called them Toffee Crunch Bars instead of caramel. They were not too caramel like to me but still yummy. It may be because I think I overcooked them a bit.

So basically these cookies have a shortbread type base (which means lots of BUTTER and less flour than the average cookie) with bits of chocolate interspersed with melted chocolate on top and then toffee bits spread over it all. How can that not bee good, right. Unfortunately I made them yesterday and my hubby had a late night so it was a night alone with a pan of amazing bars just staring me down and lets just say I gave in. By morning I decided to let these babies out of my sight and brought them to a friend who quickly gobbled them up saying that they were heavenly and that she is so glad I am part of this baking blog.


For a glimpse of the recipe you can go to What's left on the table.

As for the changes I made....I used Belgium dark hot chocolate powder in place of instant espresso powder for religious reasons. Whit said that she thought the bittersweet wasn't the best in the bar so I used mini semi sweet chocolate chips. As for the top I used symphony bars because they are oh so yummy and I really wanted milk chocolate. I used a smaller pan because I read in the P&Q's that someone thought they were too thin and I thought I really like thicker bars anyway. And I think my most brilliant move was that I added pecans to the top. I just felt like these needed nuts, because toffee and chocolate really do belong with nuts.


I think I overcooked my bars a little. It said to cook them until the base is bubbly and puckery. It was definitely bubbling, which was really cool to see. But I didn't know at what point to pull them out. I kept pulling them out but felt like they still looked wet on top and even a bit liquidy inside and so they just kept bubbling. Even if they were over cooked I really really like them that way. They were toffee-like and crunchy on the outside, but easy to chew on the inside.So so good! So if you are feeling like a rich indulge try these babies out. Definitely a keeper. It was worth trying them even though I suffered one mural on the bathroom door during the process of cooking these goodies. Now I need to stock up on magic earsers.

Thursday, February 19, 2009

Big Fat Chewy Chocolate Chip Cookies


These are THE FAVORITE chocolate chip cookie at our house. I struggled for a few years to make good chocolate chip cookies and these ones have finally satisfied me and my hubby too. I have made them for several people and always get asked for the killer recipe. I have shared this on my own blog about a year ago, but Lizzie told me she didn't get the recipe so I thought I would share it on here too. The recipe is from allrecipes so you can go there if you are looking for tips, but they have always turned out for me. These are so so so yummy and will make anyone you bring them to happy. They really are gigantic. More like a meal than a little treat.

Big Fat Chewy Chocolate Chip cookies

2 cups all-purpose flour
1/2 teaspoon baking soda
1/2 teaspoon salt
3/4 cup unsalted butter, melted
1 cup packed brown sugar
1/2 cup white sugar
1 tablespoon vanilla extract
1 egg
1 egg yolk
2 cups semisweet chocolate chips

1. Preheat the oven to 325 degrees F (165 degrees C). Grease cookie sheets or line with parchment paper.
2. Sift together the flour, baking soda and salt; set aside. (I actually do sift the flour)
3. In a medium bowl, cream together the melted butter, brown sugar and white sugar until well blended. Beat in the vanilla, egg, and egg yolk until light and creamy.
4. Mix in the sifted ingredients until just blended.
5. Stir in the chocolate chips by hand using a wooden spoon.
6. Drop cookie dough 1/4 cup at a time onto the prepared cookie sheets. Cookies should be about 3 inches apart.
7. Bake for 15 to 17 minutes in the preheated oven, or until the edges are lightly toasted. Cool on baking sheets for a few minutes before transferring to wire racks to cool completely.

(when Sarah makes these she adds about a 1/3 cup flour. I have never needed to but if you have problems with it you can try that)

Tuesday, February 17, 2009

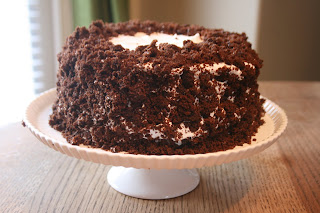
TWD: Devil's Food White-Out Cake


This was a little slice of heaven! It was so fun to make. I was quite intimidated by the description of making the fluffy frosting but it was easier than I thought. I followed her directions as closely as I could; they're quite detailed including a line "don't be concerned if the mixture looks curdled." It was a lot of fun and I was glad I got to make the cover recipe. My only complaint is that it wasn't bigger! I shared it with some neighbors and family.


The kids were very curious about what I was making so when these popped out of the oven Hailey was quick to make it even prettier. I love the help!


When I got to frosting the cake I had a fun gathering of little people. I handed Jacob a spoonful of frosting to eat and he immediately started wiping it on the 4th cake section yet to be crumbled for the top and saying "I help you?" He is quite the helper!


It was delicious! It's something I will make again because it is so unusual and beautiful. Refrigerating it makes it even better - a little more fudge-like! It's good stuff. If you'd like to make this cake check out Stephanie's website at confessionsofcityeater. Enjoy!

Monday, February 16, 2009

Broccoli and Cheese Soup


This is my first post that doesn't involve baking. Kind of funny because although I love to bake, I also love to cook. The cold, winter weather put me in a bit of a soupy mood last week. In fact, we had soup twice. Lucky us! This recipe is an adaptation of a "light" recipe I found years ago. Since I'm not a fan of using processed cheese in soup and not really interested in my broccoli cheese soup being low-fat or light, I made it the way I think it should be made. This soup is cheesy, creamy and stocked full of broccoli. This recipe is a huge hit at our house and bowls are nearly licked clean. Mmmmm! 

Broccoli and Cheese Soup
1 tablespoon butter
2 garlic cloves, minced
1 cup chopped onion
4 cups chicken broth
1 head fresh broccoli florets, cut into bite sized pieces
3 1/2 cups 2% reduced-fat milk
1/2 cup all-purpose flour
3 cups shredded cheese (we use a colby-jack blend, sometimes I use a pepper-jack and cheddar for a spicy version)
kosher salt and black pepper to taste

Heat large non-stick saucepan over medium-high heat. Add butter. Once melted add garlic and onion. Saute 3-5 minutes until tender. Add broth and broccoli. Bring broccoli mixture to a boil over medium-high heat. Reduce heat to medium and cook 10 minutes until broccoli is tender. 

Combine milk and flour, stir with a whisk until well blended. Add milk mixture to broccoli mixture. Cook 5 minutes, stirring constantly, until soup has slightly thickened. Remove from heat and add shredded cheese, stirring until cheese melts. 

Use immersion stick blender to process until soup is at desired consistency. If you don't have a stick blender, remove 1/3 of the soup and place in blender, processing until smooth. 

Happy Eating!

Tuesday, February 10, 2009

TWD: Floating Islands


When I originally read the description of the recipe I thought to myself, "Wow, this is going to be just fabulous!" Creme anglaise, meringue and caramel...how could you go wrong with those components? Well, I think this is the first of the TWD recipes that didn't "wow" me. In fact, I decided not to serve it to our friends who were coming for dessert. I used the creme anglaise over a cinnamon crumb cake that was from a box. Gasp! I know! But I liked it better than the Floating Islands. 

The creme anglaise turned out pretty good. I watched it on the thermometer and as it got into the 160's I thought it looked perfect. I should have followed my instinct and removed it from the heat right then because just a minute later it started to curdle a bit. After going through the strainer it was better but not amazingly good. When you over cook creme anglaise it begins to taste eggy instead of creamy and the texture is ruined and is not satiny smooth as it should be. But, I didn't want to start over again so I decided it would have to do. 

The meringue seemed simple enough. I whipped the egg whites and added the sugar and got it to the perfect stage. The first two came out looking like I thought they should but it kind of went downhill from there. I might have had the heat too high on the milk because some of them looked like plain cooked egg whites, and tasted that way too so they went right into the trash can. I'm not sure how some people said they cooked theirs for 3 minutes per side. Maybe I was doing something wrong. 

Oh bother, this isn't looking good at all! The caramel didn't want to cooperate either and struggled to reach a golden brown color so it went on lighter than it should have been. All-in-all this was kind of a disappointing kitchen day. Nevertheless, I still took a few pictures (but didn't feel like there were any great ones). I don't think this will be one I will make again. Fun for the challenge but it didn't amaze me by any means. I enjoyed the creamy texture of the creme anglaise against the fluffiness of the meringue and the crunchy caramel but there was just something missing for me. 

If you want to be brave and attempt this dessert yourself, head on over to Whisk: a food blog where Shari has it posted.

Until next week...Happy Baking!

Tuesday, February 3, 2009

TWD: World Peace Cookies

If everyone in the world could eat these cookies, we would most definitely have world peace! This is positively my favorite TWD recipe so far! Thank you Jessica of Cookbookhabit (check out Jessica's blog for the complete recipe)!!

I knew this recipe would be a hit when I realized it was of the shortbread family! What's better than a cookie with so much butter?

The secret ingredient to these cookies is supposedly sea salt; however, I had a quiet moment Sunday afternoon and decided to make them without the sea salt (I hadn't gone grocery shopping yet!). I loved the cookies, but will definitely make them again using the secret ingredient!

In the P&Q's many people commented they had problems with their dough being crumbly, but I didn't find this to be problematic at all. The dough is definitely a different texture than the average cookie, but it rolled up just fine, sliced well, and baked perfectly. The only problem I had with my cookies...I ate too many of them! What does everyone say they want in life? World peace...cookies!